Just Feel Awsome

World Collection Wallpeper , Beautifull Mehendi Disign , World Dreses , Indian Pakistani Recipes And Book , Romantic poetries , Facebook Cover , Facebook Dps , Romantic Poetry sad Poetry , Software And Game And Many More Just Feel Awsome !

Like!!Page

Sunday 4 May 2014

How to Block Ads Online on Google Chrome Forever

If you’re angry from annoying online advertisements scroll in, bumping up to lose your focus while you’re at work or working for your assignment, watching live stream online or doing anything else. Are you really tired of those creepy advertisements and you just want them away from your computer screen then you’re at the right place because here you’ll know how you can hide most of the annoying online advertisements. However my personal suggestion is to use this guide as information purpose only or when you seriously need to hide online ads.

The reason why I’m telling you that if you block ads for a specific website/blog that might providing free valuable services. You should know that their income mostly based on these online advertisements. So, my suggestion is if you visit websites / blogs to learn something it’s better to keep the ads unblock and that’s appreciable.
As you’re trying to block online ads, I am supposing that this may be the moment  when you’re trying to watch cricket matches from free live streams or something else. OK let’s go through how you can block online advertisements. Since Google Chrome is popular browser among people online more than any other browsers because of it’s speed. That’s why this make me to write a guide for Google Chrome users first . Let’s follow the step-by-step guide:

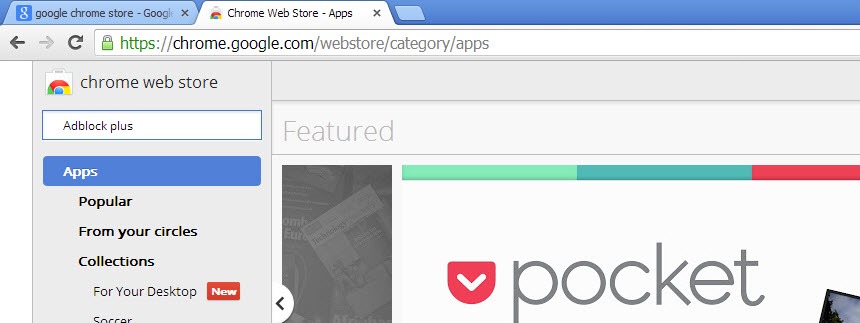
STEP ONE: OPEN GOOGLE CHROME STORE WEBSITE

I am assuming that you’ve installed and open the Google chrome window on your computer. Now point your cursor to Address-bar or simply press ‘F6’ this will take you address-bar and Type ‘www.Google.com’.


Type the keyword “Google chrome store” this will help to take you to Google Chrome store website


STEP TWO: SEARCH FOR AD BLOCK PLUGIN
You’re at Google Chrome Store website now, to find the ad blocker you’ve to type “Adblock plus” in search box at top left corner of the website and hit ‘Enter’ key.


STEP THREE: INSTALL THE GOOGLE CHROME PLUGIN
After the search it will list lots of Ad blocker plugins for you, however in my experience I have found ‘Ablock plus’ one of the most useful plugin for blocking ads online. It blocks all type of ads even block flash ads as well. You can try other chrome plugins as you like but I recommend you to use Adblock Plus plugin. Click ‘Free’ button to install.


STEP FOUR: BROWSING WEBSITES TO SEE IT’S WORKING
After successful installation of ‘Adblock Plus’ plugins you’ll see a window appearing with message “Adblock Plus has been installed”. It means that Plugins has installed and activated on Google Chrome browser. I usually test whether ad-blocking function is activated or not I use Free Live Stream websites because these come with too much advertisements. I just took of a screenshot of before and after installation of ‘Adblock plus’ plugin.


Live Stream Website before Installation of Ad blocker and advertisements spotted with yellow outlines


After Installation & Activation of “Adblock Plus” chrome plugin


You can see that ‘Adblock Plus’ is working perfectly on Google Chrome. Now let’s enjoy getting experience of using internet free from any advertisements.  You can unblock ads for specific website by clicking on the red icon of ‘Adblock Plus’ appear on the right of address-bar and uncheck ‘Enabled for this site.

And again at last, please don’t forget that online advertisement are the main source of income for most of the free websites, blocking ads could harm their earnings, may lead to shutdown their website if everyone is using these plugins. So, whenever possible unblock the ads to keep them providing valuable free services.

Posted By: MR Tariq on Sunday 4 May 2014

Saturday 3 May 2014

How to create Windows XP boothable USB


How to create Windows XP boothable USB

If you try to install window XP (Sp2, SP3) on PC computers or on old laptops with CD/DVD some time the files on drive (CD/DVD) get corrupt due to scratches. Some people can not afford to buy a new CD/DVD again and again. So seeing these problems we tell you that how you can make a Windows XP boothable USB drive and use it with any type of computer to install window XP.

If you make a windows XP boothable USB flash drive boot disk, you have taken a the easiest and most important steps towards making your computer easy to maintain and repair. But you can also install USB boot disk or re-install an operating system Windows XP for example. In addition to a flash drive more durable compared to a CD/DVD, a flash drive or bootable USB based windows XP installation will take far less time than a CD/DVD based Windows installation, for a flash drive supports random access, as opposed to a CD/DVD, and thus between different bits of Data can be much faster than a CD-ROM drive.

For preparing a flash or bootable USB drive Window you need some thing which we are mention below.

1.   USB or Flash drive  (Minimum 4GB capacity)

2.   Bootable USB drive with Windows XP installation files.

Implementation of XP on USB drive

1.   If you already have the XP installer to your flash drive, go to Section 2 Otherwise, put your Windows XP CD into your computer and connect the USB flash drive.

2.   Install a utility to create a boot disk from the CD. The best choice for this task is Novicorps WinToFlash, available free online.

3.   Install and open WinToFlash. Click on the “Task” tab and select “Transfer XP/2003 Installation Windows via USB Drive” from the drop down menu.


4.   Click “Run” and direct the program your CD drive and flash drive by clicking on the button “Select” next to “Windows source path” and “USB Drive“.

5.   Click again on “Run” and let the program copy the files to your flash drive.

Installation of Windows XP viva USB

1.   Connect the USB flash drive into an available USB port on your computer. Make sure that the drive is recognized as a drive in “My Computer” window safely. Disconnect all other USB devices from the computer.

2.   Turn off your computer, then turn the power on again. Immediately after turning on the computer you access your computer’s BIOS by pressing the “F2” key “F8” or any other button, which should be displayed on the first screen that displays when you start your computer.

3.   Go to the “Boot” or “Boot Device Select” and you will find the item labeled “USB drive” or something similar (This will vary depending on the manufacturer of the computer, so use your best judgment to decide which is the right option for your machine).  Move the item you found in step 3 to the top of the list.

4.   This is the first priority when starting your USB flash drive in the computer. Save your settings and exit. The computer should automatically begin to install Windows XP from your flash drive. If this is once again not to start the case, only to restart the installer.

Tips and Warnings

helpful tips 150x150 Windows XP boothable USBYou can not set the BIOS to boot windows XP from USB devices, unless you plan to regularly boot from the flash drive. If you leave set to boot from a USB device, the BIOS, make sure to separate all USB devices from your computer every time you reboot or shutdown. Leave a non-bootable USB device connected cause that computer does not start properly.

Posted By: Unknown on Saturday 3 May 2014

Thursday 1 May 2014

How To Unblock Youtube In Pakistan Without Proxy

Today, I am going to share with you the best trick which everyone want who use internet and keen on watching videos on internet. Yes I am talking about a largest video share network YOUTUBE. As we know youtube is block in Pakistan since few years. But people use it by change their IP address and use many software Like; Hotspot shield, Ultra surf. While using these things they face many problems. But now you are on the right track I am going to share the best trick for using Youtube.com. This method will permit you to open and watch youtube video without proxy and vpn.

Method :

Go to My Network Place Properties
Then go to Local Area Connection Properties
Then go to Internet Protocol (TCP/Ipv4)
Preferred DNS Server (type this) 8.8.8.8
Alternate DNS Server (type this) 8.8.4.4.
Now open your Browser
Type https://www.youtube.com

Posted By: Unknown on Thursday 1 May 2014

Wednesday 30 April 2014

How to get Your Website Indexed Quickly in Google


This is the most common question people when they start their website. They wait to for weeks to get their site indexed on Google Search Engine. When you launched a new website it does take few days to get it indexed. I can guess many of you want to have your website Quickly indexed on Google Search. To get indexed quickly in Google Search you have to follow some Quick & Easy steps.

So follow these steps to get indexed quickly: -

* Post in any popular, open registration forum with the page or URL in there. Since the Google bot is always crawling the forum, the chances are good it will find your link through your post.
* Submit your sitemap in Google Webmaster Tools. Submitting a sitemap is telling Google that your site is “crawler friendly,” and mapped out.
* Submit your site or page to Digg and Social Bookmark Sites like Del.icio.us or Furl.net. These social networks have large influence with Google.
* Set up a blog on your domain, even if you don’t like blogging. Blogs allow convenient pinging of the search engines. By posting a few posts and pinging Google, you invite the Google bot to check out your site, which will hasten indexing, often within a few days or less. The blog can be removed later, once your site or page has been indexed.

Based on my observations, there are certain types of domains (usually in certain “dubious” niches), that have a tougher time getting indexed, even though they may not be blacklisted at all.

Posted By: Unknown on Wednesday 30 April 2014

How To Install Window Xp in 15 Mint

Now, this tip will be very helpful for those who frequently install windows xp operating system. Normally OS installation takes around 40 minutes to complete, but through this trick you can now save 10-15 minutes. This simple tricks goes this way.

1. Boot through Windows XP CD.

2. After all the files are completely loaded, you get the option to select the partition. Select “c”.
3. Now Format the partition, whether it is normal or quick with NTFS or FAT
4. Once the formatting is completed, All the setup files required for installation are copied. Restart your system by pressing Enter.
Now, here begins the Simple trick to save 10-15 minutes.
5. After rebooting, you get a screen where it takes 40 minutes to complete or finalize the OS installation.
6. Now, Press SHIFT + F10 Key ->  This opens command prompt.
7. Enter “Taskmgr” at the command prompt window. This will open Task Manager.
8. Click the Process Tab, here we find a process called Setup.exe -> Right Click on Setup.exe -> Set Priority -> Select High or Above Normal. Initially it will be Normal.
Thats it, no more work to do. Relax your self and see how fast the installation process completes

Posted By: Unknown on

Paypal In Pakistan


Today we will learn an easy and free way to verify account PayPal in Pakistan so that you can receive payments from almost any merchant in the world. The way we will do this is via Payoneer prepaid master card which will be shipped at your door step free of cost. All you need to do is to apply for that card and verify your account with it.

1. First of all remove all your browser’s history and cache.

2. Never use any proxy what so ever. Login with your normal IP address.

3. Visit Payoneer-affiliates website in order to apply for Payoneer Prepaid Debit MasterCard®. Just click on big Signup button to start with.

4. Now you will see lots of options like Personal Details, Account Information and Personal Verification buttons. Just click on that to fill all your valid information and check all the boxes at the end of the form.
5. Congratulations your card will now be shipped at your door step in just 20 to 40 days(after account approval which takes 1 to 2 business days).

6. Now the most important thing is the special email which you will receive from Payoneer about you want to apply for US banking server or not.

7. You have to reply to this email with your necessary information like why you want to apply and your identity etc. Don’t worry you can provide any information here you want to start your own hosting server and give some unknown hosting provider website name.

8. Now its for wait because they will review your application and will answer you back within 2 to 3 business days. Don’t worry they accept almost 99% applications so your will also be accepted.

9. When you receive the email containing US Virtual Account number and Routing Number save the information because you need this information to verify your Paypal.
10. Now its time to create account. Visit USA Paypal website by clicking here and click on signup button. You need to provide fake information here but don’t worry you can pick this information from Fake Name Generator.

11. After you create your account obviously they will ask you to verify it. Just click on verify with bank account option and provide the details you got from Payoneer email.
12. Now they will send you some little amount in your account like 0.07 or 0.15 etc and you need to put this information in your account in order to be fully verified. Enjoy your newly created account.


Widget is loading comments...

Posted By: Unknown on

Earn money online in Pakistan without Investment

Learn Many Ways on how to earn money online and make 100$ per day. Your Free complete step by step guide to make money online in kassowal Pakistan in urdu.


Widget is loading comments...

Posted By: Unknown on

Contact Us

Name

Email *

Message *

 
Copyright © . RajaJee. All Rights Reserved.
Designed by :-Raja Jee